Overview
Test your voice agents using text instead of phone calls. 10x faster and 90% cheaper - ideal for workflow validation, regression testing, and CI/CD pipelines. Use voice testing for ASR/TTS validation and final production checks.Supported Providers
- ElevenLabs
- Retell
- Vapi
- Bland
- Custom WebSocket
- Code
Configure Chat Provider
- From sidebar, go to Agent → Configuration → Provider, select ElevenLabs
- Under Integration Settings, enter your External Assistant ID and ElevenLabs API Key
- Click Save Changes

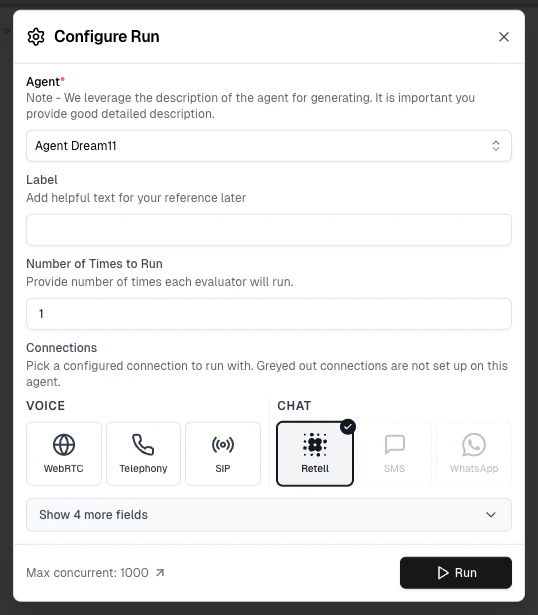
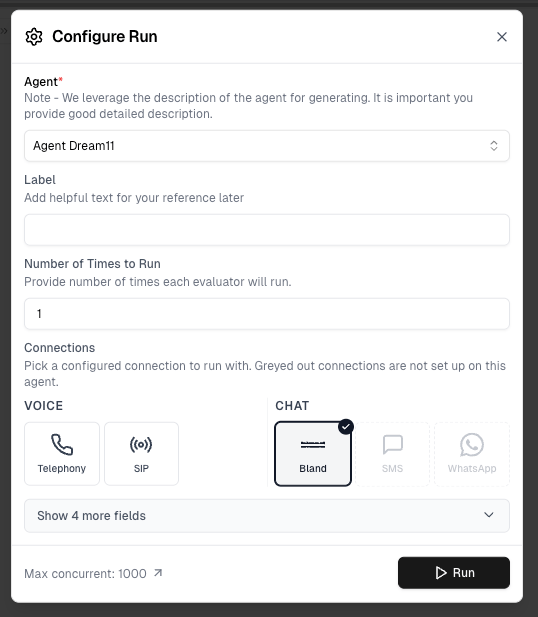
Run Tests
- Go to Evaluator page, select scenarios and click on Run button.
- In the Configure Run dialog, select ElevenLabs under Chat connections and click Run
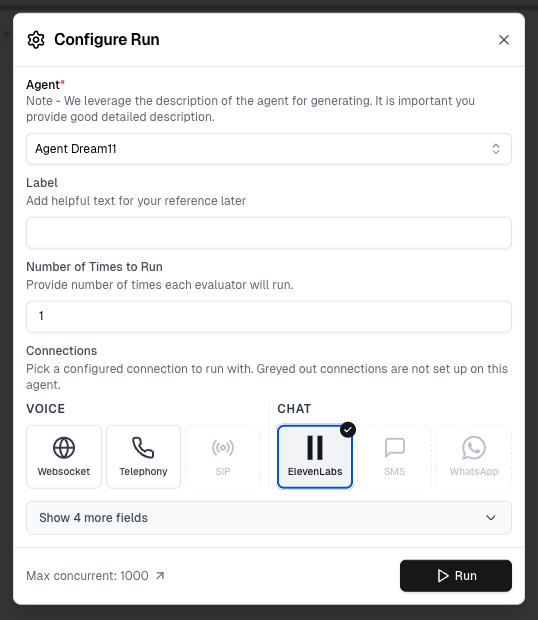
Greyed out connection options have not been configured in Agent Settings yet — set them up there to enable them.
Create Chat Agent in Retell
- Log in to Retell dashboard
- Navigate to your voice agent
- Click “Copy as chat agent”
- Copy the Agent ID of the new chat agent
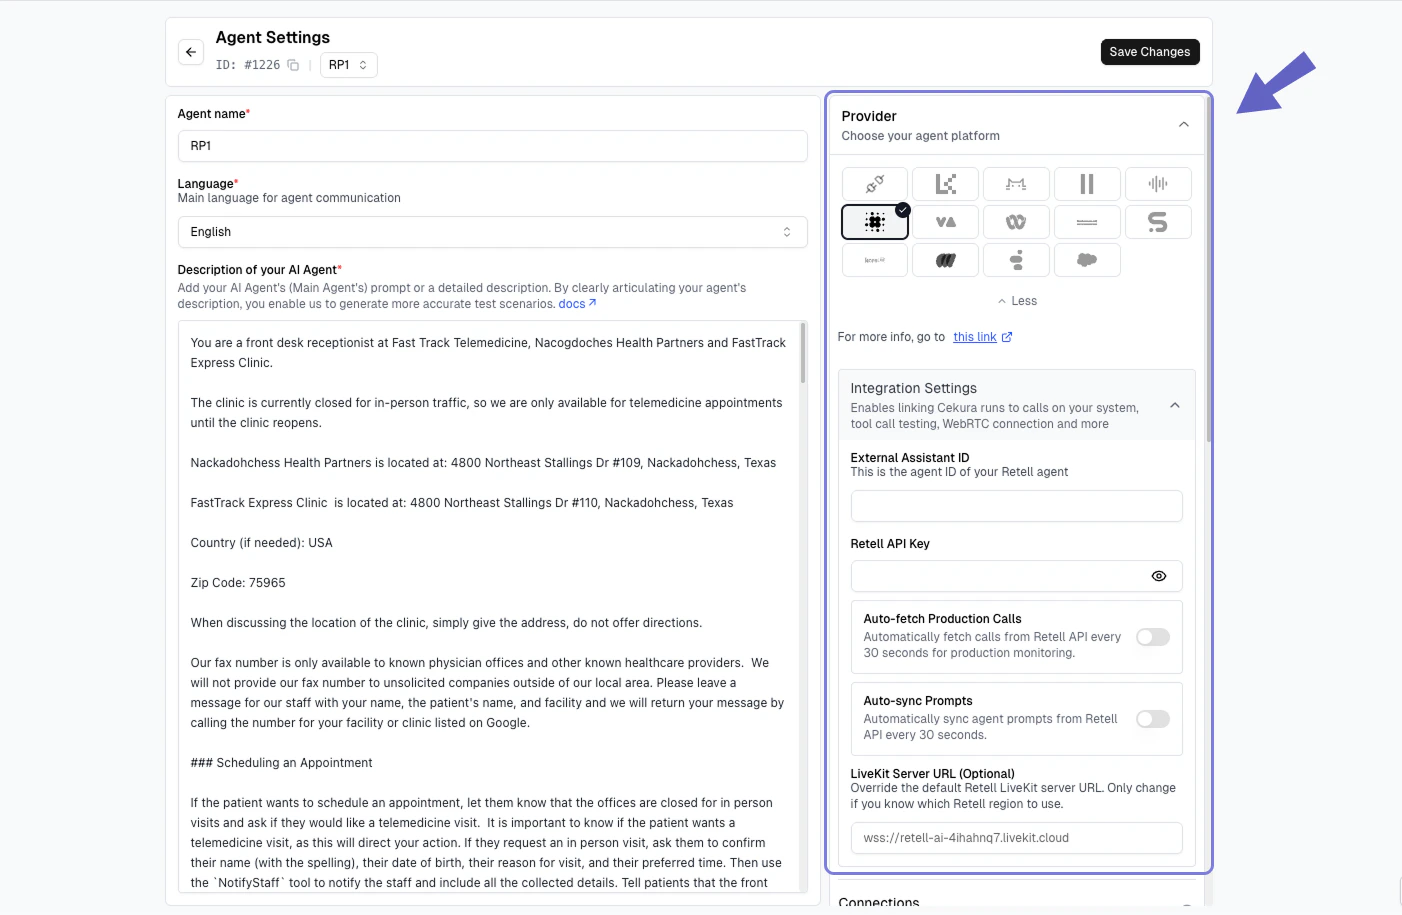
Configure in Cekura
- Go to Agent Settings → Configuration → Provider, select Retell
- Under Integration Settings, enter the External Assistant ID of your Retell chat agent and your Retell API Key
- Click Save Changes
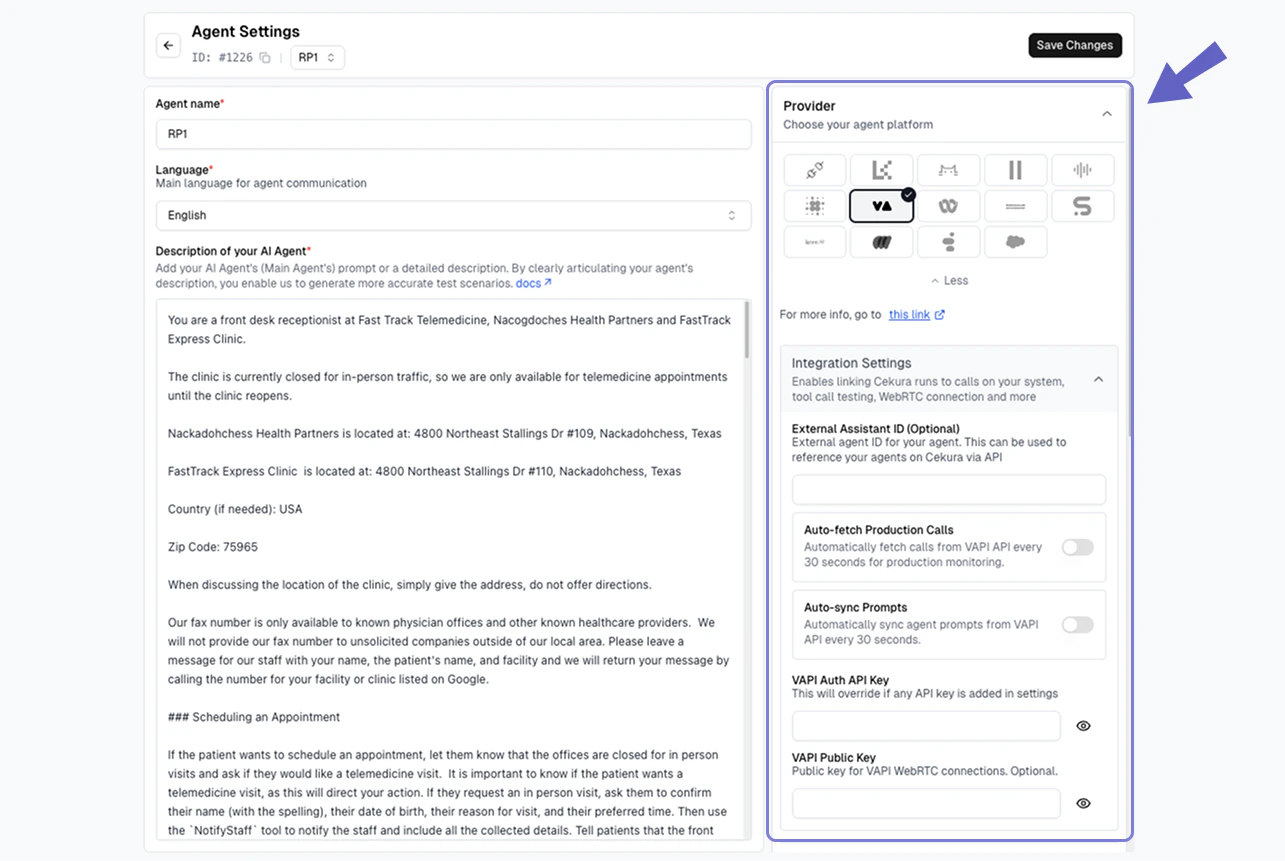
Configure Chat Provider
- Go to Agent Settings → Configuration → Provider, select VAPI
- Under Integration Settings, enter your External Assistant ID and VAPI Auth API Key
- Click Save Changes

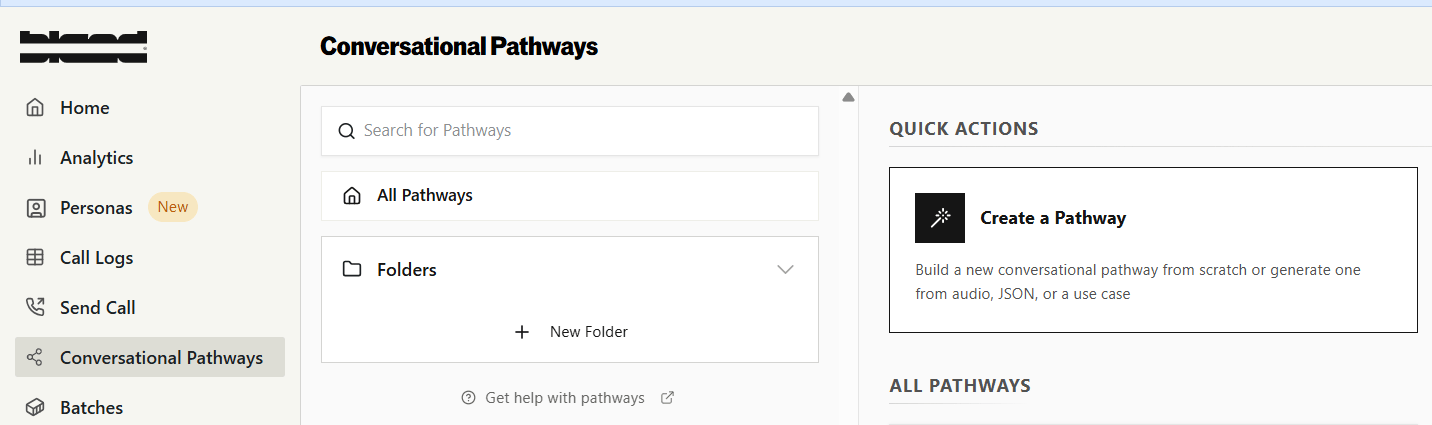
Create Pathway in Bland
- Log in to Bland dashboard
- Navigate to Conversational Pathways
- Click “Create Pathway” or duplicate a template
- Build your conversation flow using nodes and edges
- Test and publish your pathway
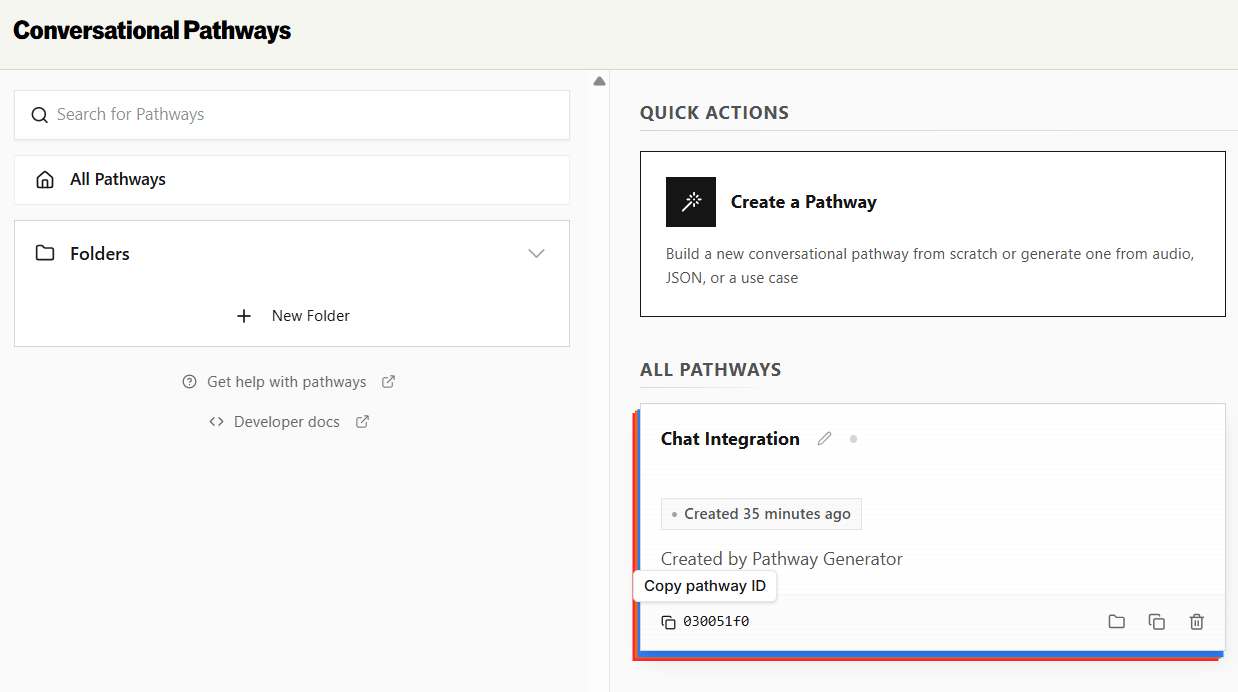
Get Pathway ID
- In Bland dashboard, open your pathway
- Copy the Pathway ID from the URL or pathway settings
- Format: UUID like
9d404c1b-6a23-4426-953a-a52c392ff8f1
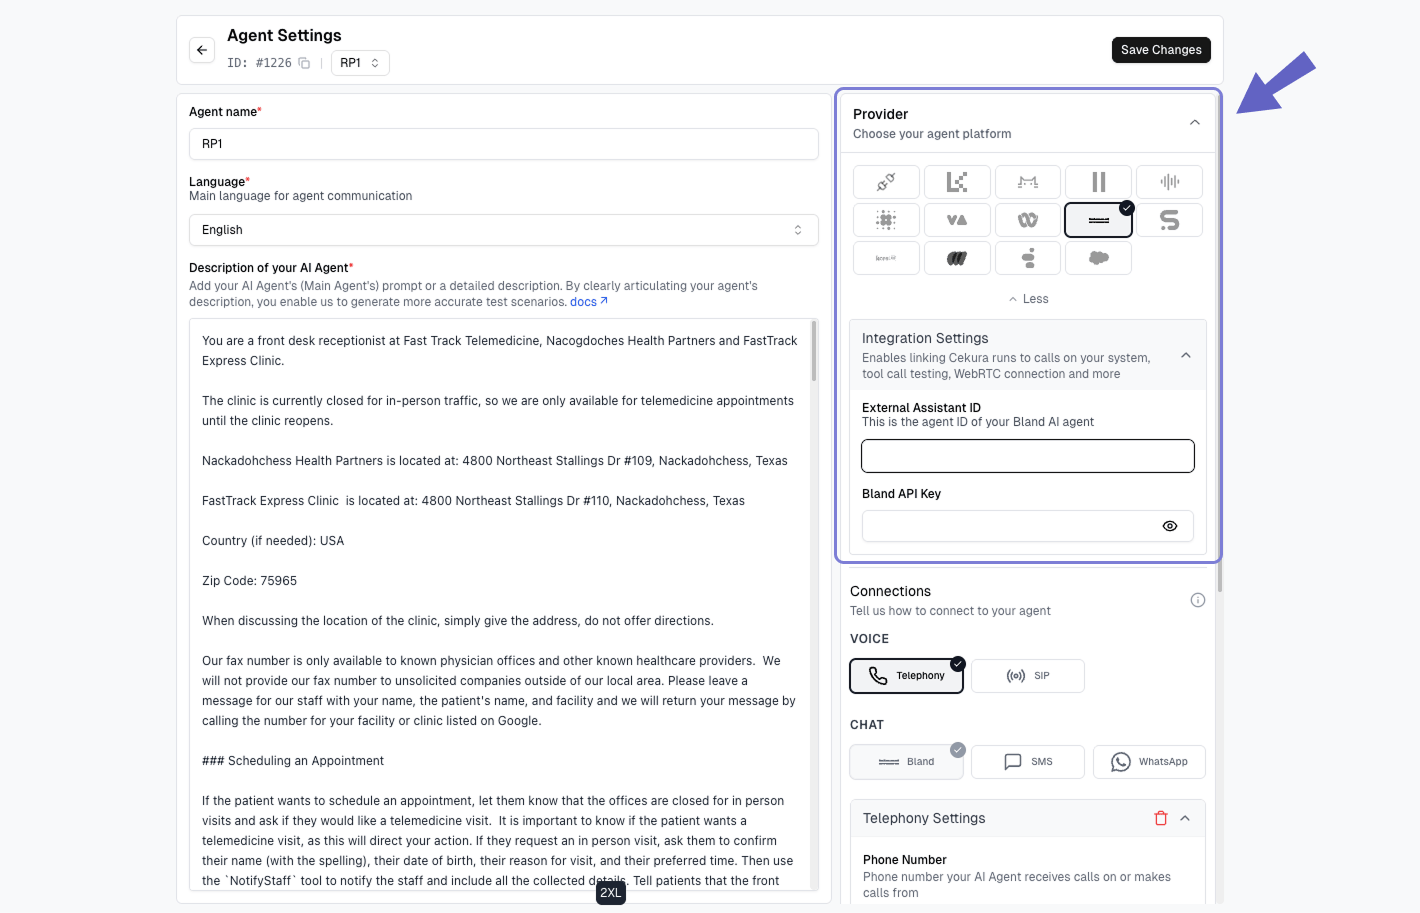
Configure in Cekura
- Go to Agent Settings → Configuration → Provider, select Bland AI
- Under Integration Settings, enter the External Assistant ID (your Pathway ID) and Bland API Key
- Click Save Changes
Set Up WebSocket Server
Use the example implementation or build your own:Authentication:When Cekura connects to your WebSocket server, it includes the following headers in the handshake request:
Any custom headers configured in your agent’s WebSocket header settings are also included.To authenticate incoming connections, validate the WebSocket Message Format:Messages your server sends to Cekura (your agent’s messages):Regular message:Message with metadata:Metadata-only message (no conversation response triggered):Function call:Function call result:End call (server-initiated session end):Messages Cekura sends to your server (testing agent messages):Regular message:End call message:Conversation Finalization & Timeouts:Either side can end the conversation. Cekura sends
git clone https://github.com/vocera-ai/llm-websocket-server-example.git
cd llm-websocket-server-example
python3 -m venv .venv
source .venv/bin/activate
pip install -r requirements.txt
python main.py
Update your OpenAI API key in
main.py before starting the server.| Header | Description |
|---|---|
X-VOCERA-SECRET | The Websocket Secret you configured in your agent’s Custom Chatbot Settings. Cekura sends this exact value on every connection so your server can verify the request came from Cekura. |
X-VOCERA-SCENARIO-ID | The ID of the scenario being tested. |
X-VOCERA-RESULT-ID | The result ID for this test run. |
X-VOCERA-RUN-ID | The run ID for this test execution. |
X-VOCERA-SECRET header against the secret you configured in your agent’s Custom Chatbot Settings:# The same value you saved as "Websocket Secret" in Agent Settings → Chatbot Integrations
WEBSOCKET_SECRET = "your-configured-websocket-secret"
async def handle_websocket(websocket, path):
secret = websocket.request_headers.get("X-VOCERA-SECRET")
if secret != WEBSOCKET_SECRET:
await websocket.close(1008, "Unauthorized")
return
# Handle messages...
{
  "content": "Hello! How can I help you today?"
}
{
  "content": "Hello! How can I help you today?",
  "metadata": {
    "customer_id": "cust_123",
    "session_type": "support"
  }
}
{
  "metadata": {
    "internal_call_id": "abc-123",
    "region": "us-west-2"
  }
}
{
  "role": "Function Call",
  "data": {
    "id": "call_abc123",
    "name": "get_weather",
    "arguments": "{\"location\": \"New York\"}"
  }
}
{
  "role": "Function Call Result",
  "data": {
    "id": "call_abc123",
    "result": "{\"temperature\": 72, \"unit\": \"fahrenheit\"}"
  }
}
{
  "content": "Goodbye, have a great day!",
  "type": "end_call"
}
To end the conversation from your server, send a message with
"type": "end_call". Cekura will finalize the session on receipt. This is the same message format Cekura uses when it initiates the end — either side can send it.{
"content": "I'd like to book an appointment for tomorrow"
}
{
  "content": "Thank you, goodbye!",
  "type": "end_call"
}
When your server receives a message with
"type": "end_call", the conversation is ending. Your server can handle cleanup and connection closure gracefully.{"type": "end_call"} to your server and waits 1 second before closing the connection — your server does not need to close the connection itself. To end the conversation from your side, simply close the WebSocket connection; Cekura treats an unexpected close as the main agent ending the call.Cekura closes the connection after 5 minutes without a content message. It also sends a WebSocket ping every 30 seconds and considers the connection dropped if no pong is received within 10 seconds. Ping/pong are handled automatically at the WebSocket protocol layer by most libraries, so no explicit handling is required in your application code.Expose Server
For local development, use ngrok:Convert the
ngrok http 127.0.0.1:8765
https:// URL to wss:// for WebSocket connection.Configure in Cekura
- Go to Agent Settings → Configuration → Connection → Chat Connection → WebSocket
- Enter your WebSocket URL (starting with
wss://) - Enter WebSocket Secret (Optional) — any string you choose. Cekura will send this value on every connection in the
X-VOCERA-SECRETheader so your server can authenticate the request. Use the Update button to change it later. - Click Save Changes
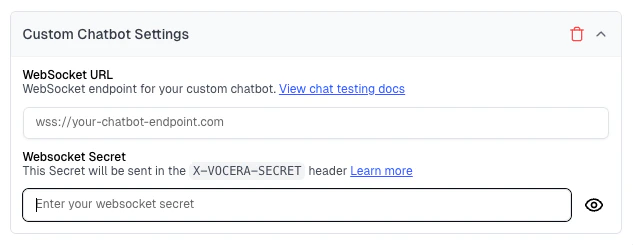
The Websocket Secret is a value you choose. Keep the same value in your WebSocket server so it can validate the
X-VOCERA-SECRET header. See the Authentication subsection under Set Up WebSocket Server above for a code example.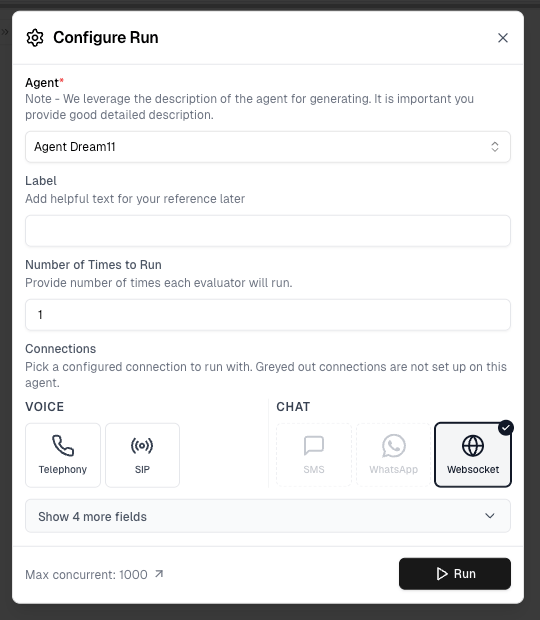
Test Profile Headers
When test profile is attached on your Evaluator and run it as WebSocket Chat, any fields in the test profile starting withX- are automatically sent as HTTP headers to your WebSocket server during connection establishment. This allows your server to receive user context before the conversation begins.Example Test Profile:{
"name": "Sarah Johnson",
"email": "sarah.j@email.com",
"X-Customer-ID": "CUST-98765",
"X-Account-Tier": "premium"
}
X-Customer-ID: CUST-98765
X-Account-Tier: premium
X-VOCERA-SECRET: <your-configured-websocket-secret>
X-VOCERA-RUN-ID: <run-id>
X-VOCERA-SCENARIO-ID: <scenario-id>
X-VOCERA-RESULT-ID: <result-id>
async def handle_connection(websocket, path):
    headers = websocket.request_headers

    customer_id = headers.get('X-Customer-ID')
    account_tier = headers.get('X-Account-Tier')

    # Pre-load customer data before conversation starts
    customer_data = await fetch_customer(customer_id)

    # Customize behavior based on tier
    if account_tier == 'premium':
        enable_priority_support()

    # Now handle the conversation...
Only fields starting with
X- are sent as headers. Other fields remain available for use in evaluator instructions via template variables like {{test_profile.name}}.- Pre-load customer/user data before conversation starts
- Route to specific handlers based on account tier or customer type
- Initialize session context with user preferences
Metadata
Your WebSocket server can attach metadata to a run by including ametadata field in any message sent to Cekura. Metadata is useful for passing contextual information like internal IDs, environment details, or customer attributes that you want associated with the test run.Sending metadata with a message:{
"content": "Hello! How can I help you today?",
"metadata": {
"customer_id": "cust_123",
"session_type": "support"
}
}
role or content) at any point during the conversation. This attaches the metadata to the run without triggering a response from the testing agent:{
"metadata": {
"internal_call_id": "abc-123",
"region": "us-west-2"
}
}
- Metadata must be a JSON object. Non-object values are ignored.
- Metadata is merged across messages using last-write-wins — if you send the same key in multiple messages, the latest value is kept.
import json

async def handle_connection(websocket, path):
    # Send metadata at the start of the conversation
    await websocket.send(json.dumps({
        "metadata": {
            "internal_session_id": "sess_abc",
            "environment": "staging"
        }
    }))

    async for message in websocket:
        data = json.loads(message)
        response = generate_response(data["content"])

        # Send response with additional metadata
        await websocket.send(json.dumps({
            "content": response,
            "metadata": {
                "model_used": "gpt-4o",
                "response_latency_ms": 342
            }
        }))
Run chat tests programmatically via API.For complete API documentation including authentication, request parameters, response format, and code examples in multiple languages, see:Run Evaluator Text API Reference
Quick Example
curl --request POST \
  --url https://api.cekura.ai/test_framework/v1/scenarios/run_scenarios_text/ \
  --header 'X-CEKURA-API-KEY: <api-key>' \
  --header 'Content-Type: application/json' \
  --data '{
    "agent_id": 123,
    "scenarios": [456, 789],
    "frequency": 1,
    "name": "Chat Test Run"
  }'
Troubleshooting
Error: "Chat provider not configured"
Error: "Chat provider not configured"
Solution:
- Go to Agent Settings → Chatbot Integrations
- Select a provider (ElevenLabs, Retell, Vapi, or Custom)
- Enter required configuration (Assistant ID or WebSocket URL)
- Save and retry
Tests timing out
Tests timing out
Common causes:
- Incorrect Assistant/Agent ID
- Custom WebSocket server not accessible
- Agent disabled or unpublished
- Verify your ID is correct
- For Custom: check server is running and URL is accessible
- Test provider’s API directly
- Check Cekura dashboard for error details
Cannot find "Run as Text" button
Cannot find "Run as Text" button
Checklist:
- ✅ Chat provider configured in Agent Settings
- ✅ On Evaluator page (not Calls/Runs)
- ✅ At least one scenario selected
Tips
Use chat tests for rapid iteration and CI/CD. Run voice tests on critical scenarios before production deployment.
Tag scenarios as “critical” or “smoke-test” to run targeted test suites in your pipeline.