Overview
Learn how to create voicemail and IVR (Interactive Voice Response) scenarios in Cekura using Structured Tests. These powerful features allow you to build voicemail receivers and menu-driven phone systems that respond to DTMF tones.Voicemail
What is Voicemail?
Voicemail systems allow callers to leave messages when the recipient is unavailable. With Cekura, you can create intelligent voicemail receivers that guide callers through the message recording process using Structured Tests.How It Works
- The voicemail system greets the caller with a personalized message
- Prompts the caller to record their message
- Waits for a DTMF signal (e.g., pressing 0) to mark the end of the message
- Ends the call after message completion, signifying the recording was saved
Creating a Voicemail Scenario
Follow these steps to set up a voicemail system in Cekura:Step 1: Open Create Evaluator Form
Navigate to the evaluator creation form and click on “Create Evaluator” to begin setting up your voicemail scenario. Select Structured Tests as the evaluator type. Structured Tests allow you to define specific behaviors based on caller interactions.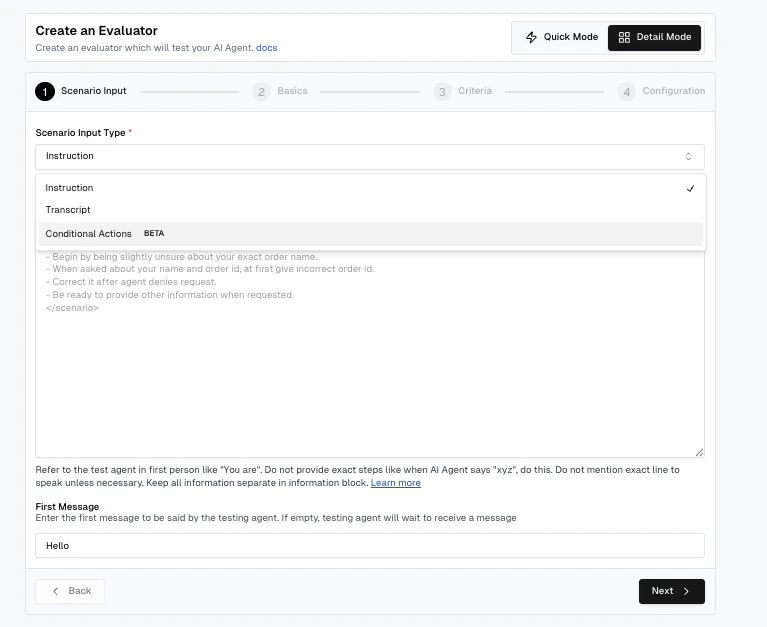
Step 2: Configure Voicemail Conditions
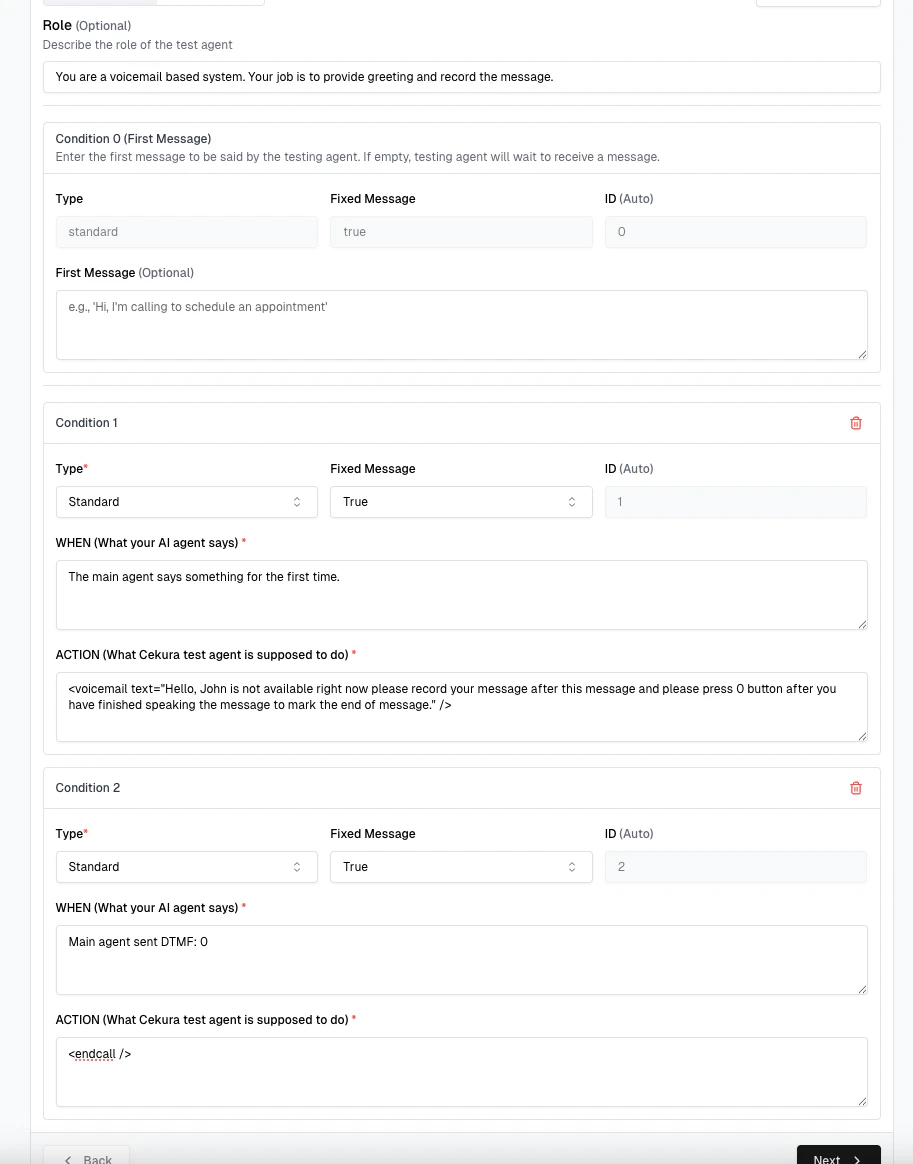
In the conditions configuration: First Message (FIRST_MESSAGE): The first condition must always havecondition: "FIRST_MESSAGE" and id: 0. For voicemail scenarios where the main agent speaks first, leave the action empty.
Condition 1 - Voicemail Greeting:
When the main agent starts the conversation, add a voicemail greeting using the <voicemail> XML tag with the following syntax:
<voicemail>, make sure to set the fixed_message field to true in your condition configuration.
Provider Support: The <voicemail> tag works with all TTS providers (Cartesia, ElevenLabs, etc.)
Condition 2 - End Call on DTMF:
When the main agent sends a DTMF tone of the digit you mentioned (e.g., 0), end the call using the <endcall /> tag. This simulates that the recording was saved successfully. Remember to set fixed_message to true for this condition as well.
Following is an example of how to do the same.
Step 3: Enable Receive DTMF
In the final step of evaluator creation, you need to enable the Receive DTMF toggle. This allows our testing agent to receive DTMF tones from the user agent side, which is essential for voicemail functionality since your agent needs to send dtmf tones to our testing agent. Enable the Receive DTMF toggle in the evaluator configuration as shown below: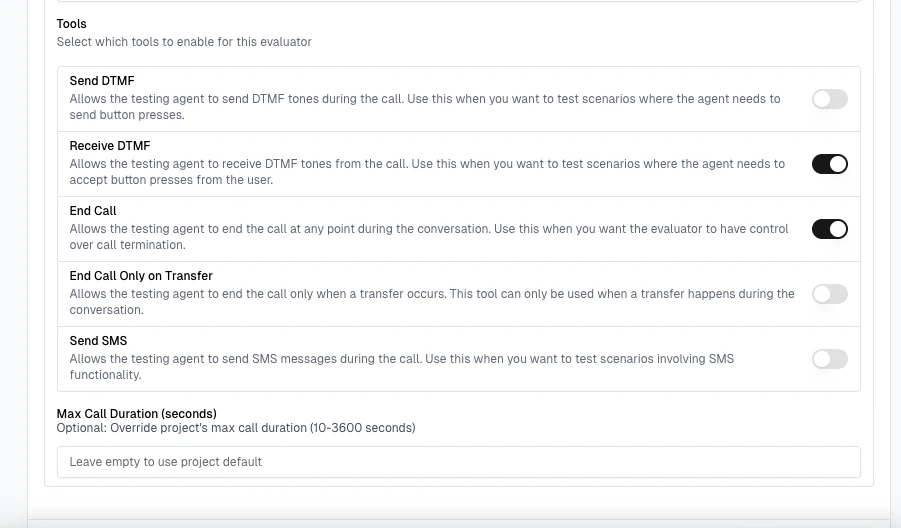
Complete Voicemail Configuration Example
Here’s a complete JSON configuration example for a personal voicemail system:- conditions: Array of condition-action pairs that define the voicemail flow
- role: Defines the agent’s behavior as a voicemail receiver
- fixed_message: Required on every condition — set to
truewhen using XML tags (<voicemail>,<endcall />),falsefor natural language instructions - action: Contains either XML tags for structured responses or natural language instructions
Key Voicemail Features
- Personalized Greetings: Custom messages for different recipients
- Message Recording: Capture caller messages automatically
- Completion Signals: Use DTMF tones to indicate message completion
- Automatic Call Termination: End call after message is recorded
- Structured Tests: Define specific behaviors based on caller interactions
Voicemail Best Practices
- Start with a clear greeting identifying the recipient
- Provide explicit instructions for leaving a message
- Specify how to end the message (e.g., “Press 0 when finished”)
- Keep the greeting brief and professional
- Ensure the Receive DTMF toggle is enabled for your evaluator
- Consider adding options for urgent messages or alternative contacts
- Test with different phone carriers to ensure compatibility
Voicemail Use Cases
- Personal voicemail boxes
- After-hours message collection
- Event registration confirmations
- Customer callback requests
- Survey response collection
- Automated appointment reminders with response capture
IVR (Interactive Voice Response)
What is IVR?
IVR systems provide menu-based navigation for phone calls, allowing callers to interact using keypad inputs (DTMF tones). With Cekura, you can create complex IVR flows using conditional scenarios and XML tags.How It Works
- The IVR system waits for DTMF tones from the caller
- Based on the received tone and current menu context, the system responds with the appropriate action
- Actions can include playing menu prompts or transitioning to natural conversation
Creating an IVR Scenario
Follow these steps to set up an IVR system in Cekura:Step 1: Create Evaluator with Structured Tests
Navigate to the evaluator creation form and select Structured Tests as the evaluator type, similar to the voicemail setup.Step 2: Configure IVR Menu Structure
Define your IVR menu flow using conditions and actions:- FIRST_MESSAGE: Set up the initial greeting and menu options
- DTMF-based conditions: Create conditions for each menu option based on DTMF tones
- Actions: Use
<ivr>XML tags for menu prompts or transition to natural conversation
Important: When using XML tags like
<ivr> in your actions, always set the fixed_message field to true. Only set fixed_message to false when you want the agent to respond naturally without using XML tags.Step 3: Enable Receive DTMF
Just like voicemail, IVR systems require our testing agent to receive DTMF tones from the user agent side, since our bot acts as an IVR system. Enable the Receive DTMF toggle in the evaluator configuration. This feature works with all phone number providers, making it easy to set up IVR functionality.IVR Configuration Structure
IVR scenarios are configured using a JSON structure with conditions and actions:Condition Object Structure
IVR XML Tags
Use the<ivr> XML tag to define menu prompts. Remember to set fixed_message: true when using this tag:
<ivr> tag works with all TTS providers (Cartesia, ElevenLabs, etc.)
Example: Hospital IVR System
Key IVR Features
- Menu-Based Navigation: Guide callers through structured menus
- DTMF Detection: Respond to keypad inputs (0-9, *, #)
- Context-Aware Routing: Different actions based on previous menu selections
- Hybrid Mode: Mix IVR menus with natural conversation (set
fixed_message: false)
IVR Best Practices
- Keep menu options concise (3-4 options per menu level)
- Provide clear instructions for navigation
- Always include an option to return to the main menu
- Offer an escape to natural conversation when needed
- Use consistent DTMF patterns (e.g., 9 for main menu, 0 for operator)
- Ensure the Receive DTMF toggle is enabled for your evaluator
- Test menu flows thoroughly before deployment
IVR Use Cases
- Customer support routing
- Hospital/healthcare information systems
- Appointment scheduling
- Order status inquiries
- Department directory navigation
- Multi-level menu systems for large organizations
Next Steps
After configuring your voicemail or IVR scenario:- Test thoroughly with different DTMF sequences
- Monitor call transcripts for user behavior patterns
- Refine menu structures and prompts based on usage data
- Ensure proper error handling for invalid inputs
- Update prompts for clarity and efficiency